
Monday, November 4, 2013
Time to Get Sewing
The time has come! Quilt blocks are coming in and it's time to start putting them together! Along with many quilt blocks, I've received a fully finished quilt, a quilt top and lots of fabric. I'm excited to see everything coming in and can't wait to get to CO! My flight has been booked; I leave the day before Thanksgiving and return that Sunday. I'll be volunteering with All Hands Volunteers in Greeley, CO. I will post a more detailed post soon with photos of the donations I've received and finished quilts.
Monday, October 14, 2013
It Has Begun!

I was SOO thrilled to see this post on Instagram earlier this week. Patty is the first person to participate and share her blocks. It was so great to see someone as excited as I am!

This weekend was a great time for me to start my personal quilt to donate. I'm not very patient when it comes to waiting on others, so I figured I'd work on my own quilt while I wait for blocks to start arriving :) I decided on red, white, and blue because when I found this fabric bundle, I fell in love!! It was so busy and patriotic, I couldn't turn it down! I thought it would be perfect for this project, AND for the November challenge "Design Your Own Quilt" at the Rhode Island Modern Quilt Guild.


So yesterday I cut out forty 8in blocks, 8 of each of the 5 fabrics. I had tons of scraps and wasn't sure what to do with them so I started sewing them onto the squares. No two blocks ended up the same. Some had diagonal designs, like above, others had straight strips added on. Each block stayed at 8in though. I did half with scrap "designs" and half stayed as plain blocks.

Next, I laid all the blocks on the floor and played with the final layout. I didn't want two of the same fabrics side by side, it took a little while, but eventually I got it figured it. With no help from this guy, of course! Luckily, all the rows were already sewn together!


This is the finished quilt top! I must say, I LOVE IT! I felt like I got it done so quickly too.

Today, with quilt top done and backing in hand, I decided I needed to add some pzazz to the back of the quilt. I took the scraps I had left, and made a scrap block for the back. I'm keeping the outcome a secret until the very end!

Quilting on this beauty started, but I'm not expecting to finish it quickly. I'm new to machine quilting (I was taught hand quilting on the block corners with embroidery thread) so I plan on taking my time. Not to mention, I want this quilt to be as perfect as it can be!
Wednesday, October 9, 2013
Quilts for Colorado
Today I started my email frenzy. I sent emails to all volunteer organizations doing the flood clean up in Colorado, with hopes that they'll spread the word about this project. I'm really hoping to make it to CO for Thanksgiving weekend so that I can personally deliver quilts and assist in the clean up efforts. Having been in RI to see the destruction of Hurricane Sandy, I know how much volunteering is necessary. With my research for volunteer opportunities I found there isn't anything being done in NM. I'm not sure if this is because there's more destruction in CO or if the flooding was minimal, so I still hope to bring some to NM but CO will be first priority. If anyone knows anything, please let me know! I'll keep you posted when I find out my volunteer plan.
Tuesday, October 8, 2013
Rhode Island Modern Quilt Guild
This weekend I attended my first Rhode Island Modern Quilt Guild meeting in Lincoln, RI. I must say, I was relieved to walk in to a group of woman of all ages and skill levels. It was a great meeting and I saw so many amazing quilts - I can only hope to make one that good! I'm excited to keep attending monthly meetings and make some new friends; hopefully they can teach me some of their secrets :) I was able to share my plans for Quilts for CO and NM! They sounded excited to help and shared the information on their blog.
As I spread the word more and more, I'm starting to get anxious by what the outcome is going to be. Am I going to get 10 blocks? Or am I going to be totally overloaded with tons? Either way, I'm so excited for this project. Once we get closer to November and I begin planning my hopeful CO visit, I am going to be looking for help. I'm a beginner quilter, and as much as I'd love to be confident that I can do this all my self, I know that's being too adventurous. So if you're unable to make blocks, or you'd like to help in another way, please let me know. I'll be looking for help basting, quilting, and binding some of the quilts.
If you're planning on sending in some blocks, please email me for the mailing address. I'm not totally comfortable with posting it online, so I'd rather answer everyone personally (Also gives me a glimpse at the blocks I'll have coming in)
RIMQG Members, feel free to hold your blocks until the November meeting!! Or contact me and we can try to meet up. No need to waste money on shipping :)
Please share this information on your Facebook, Twitter, Instagram, etc!! I also have a flyer I'd be happy to send to anyone that can post it at their work, gym, etc. I appreciate all the help spreading this project.
Wednesday, September 18, 2013
Quilts for CO and NM

Fast forward to today, as I watch another news caster talk about the over 500 people still unaccounted for in Colorado & New Mexico and countless others homeless. I can't help but wonder how can I, one 24 year old from little RI, help these people and make a lasting impression in their lives.
So this is my goal, to bring warmth, love and kindness to those who may be feeling homeless, depressed, and worried about what their future brings.
This is as work in progress and I don't have all my plans in a row just yet, but I'm hoping you're willing to jump on board with me and make an impact to these devastated people. I'm in the process of contacting local guilds to help me carry out this project. Once things have settled a bit, I plan on contacting authorities in CO and NM so I'm able to get these quilts in the right hands.
My plan, so far, goes as follows:
1. Quilt colors will be red, yellow, blue and white. These are the colors of the CO and NM state flags. Fabrics may be solid or print, as long as they are these colors.
2. I'd appreciate help from all skill levels. I'm a beginner sewer, so I encourage even the least experienced to give it a try! I found the Scrapp Trip Along to be a very simple, yet fun block to do.
3. Blocks should be 12 1/2" tall by whatever length you'd like. This means they may be 12 1/2" by 6" or 12 1/2" by 16" (The Scrappy Trip Along above becomes 12 1/2" by 12 1/2") Anything is welcome.
4. Please use quality quilting fabric and thread.
Please mail blocks by November 1st. I'd like to have some quilts done before Thanksgiving because I have volunteered to help and I'm hoping to go Thanksgiving weekend!
I will post a mailing address in the coming days.
Please comment or email (amccormick730@gmail.com) with any questions or suggestions you may have.
Tuesday, August 13, 2013
Glow under Black Light Cupcakes
These have to be my favorite cupcakes, by far!

This weekend we had a neon 21st birthday party to go to. I've had this pin for Glow in the Dark Cupcakes on my Pinterest for months and thought this was the perfect opportunity to try it!

I did my cupcakes and frosting as normal, adding a small drop of tonic water to the frosting as it was mixing. Next, I put the cupcakes in the freezer so the frosting would free. After about 20 minutes, we dipped the cupcakes into a cup of tonic water and let it drip. Once they were all dipped, we put them back in the freezer until party time. We topped a few of them with Nips, as you can't go to a 21st birthday party without alcohol for the birthday boy!


As you can see, they glow pretty well! Next time I'll probably dunk them a few times, freezing them in between so they're really covered in the tonic so they glow bright!
Saturday, August 10, 2013
Seashell Cupcakes

Tradition in my family calls for our "Annual Lobstah Fest." This is when the whole McCormick gets together for games, conversation and steak & lobster dinner. My mom made chocolate lobster pops so I did seashells to top the cupcakes.


Thursday, July 4, 2013
'Merica Cupcakes
Happy 4th of July!


These cupcakes are pretty self explanatory! I did three colors in one bag so the frosting got the color blend effect. The last couple cupcakes ended up turning purple because the red and blue blended.
Hope everyone had a great holiday weekend!
Saturday, June 29, 2013
Sunflowers
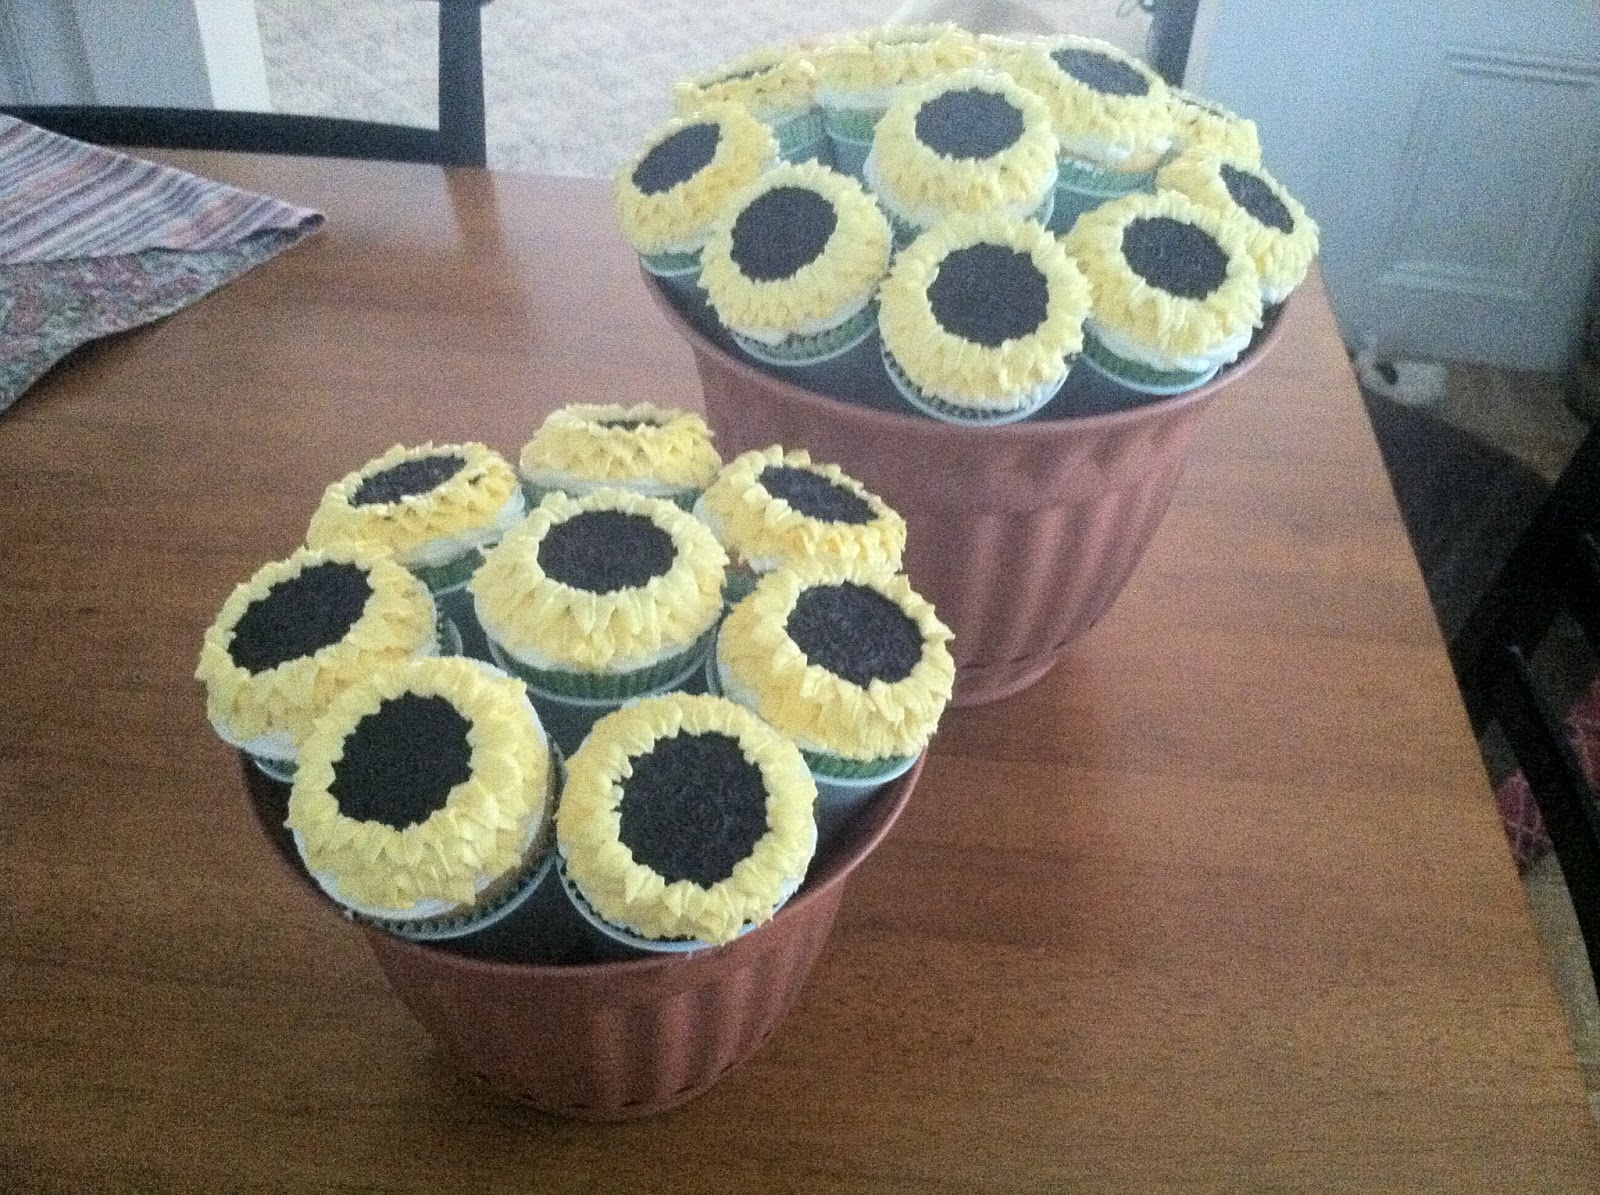
Graduation season is here again! This year I started with an order for Sunflower cupcakes in a flower pot. The customer sent me a picture she had found online and asked me to recreate it.

The final display!
The most important part of this order was the flower pot. I had never done it before and had never seen it done, other than online. So there was a lot of guessing. I bought two different sized pots because I didn't know how many cups I could fit and I didn't want to go back out! I used 5oz plastic cup and a glue gun.I glued them in the middle outside of the cups so they'd be angled a bit. Once I had the outside cups glued, I did the cups in the center. The small pot only needed one, the larger needed 3. For those, I glued them on the outside bottom because the middle didn't touch any other cups. After they were all dried, I placed them inside the pots and glued three of the cups to the pot. I added a bow and TA-DAH!

The flower pots and cupcakes ready for delivery
To start with, I had to try many different styles to get the flower I wanted. Without the white swirl around the Oreo, the sunflower seemed too tall and awkward.The mini Oreos were too small for the sunflowers.


The failed trials.
The successful cupcakes started with the top of the cupcake sliced off to make a smooth flat surface. (Sorry I forgot to take a pictures!) I did a swirl of white icing around the edge of the cupcake, then put the Oreo in the center directly on the cupcake.

Using my tip # , I started putting pedals around the Oreo. I started at the bottom and went all the way around, then I did the next row started in between each prior pedal so they all showed and didn't just pile up. Once I got to the top of the Oreo, I did the pedals standing up so they'd "flop" over like pedals at the top of a flower do. I wiped my tip before each pedal so it had a clean edge.

A single finished Sunflower.


Tuesday, June 25, 2013
Wilton Cake Decorating Class - Day 4
My Wilton Decorating Basics class has come to an end, but not without a great final cake!

We started the class learning how to make ribbon roses. I have to say, I'm so excited to know how to make roses! I've tried and tried, watched YouTube video after YouTube video, and I just couldn't get it! This is especially frustrating considering how easy Cake Boss and Cupcake Wars make it look!

I'm still nowhere near as fast as good as Cake Boss, but at least I know the correct process and I can practice!


This is my favorite of all my trials!
Next came our final cake. We were asked to bring a cake already frosted and ready to be decorated. I started with a chocolate cake with chocolate frosting because I wanted to bring it to my grandparents and my Papa has been asking for chocolate cake for as long as I've been baking. No better time than the present right?!

Although I loved my roses, all 10 woman in the class were doing the same basic cake and I wanted to try something different. I love doing color blending and I thought Hydrangeas were the perfect flower to do. I started with light blue and dark blue in one bag with the 2M tip (big tip, closed star) I started with just the top three but decided that the cake needed something, and I didn't think a border would look right.


Well overall, this was such a great class. I learned more than I expected and I had such a good time. I'm so looking forward to signing up for the next class, once I'm able to drive again after my surgery.
After much research, I'm even hoping to apply as a Wilton class instructor! They're always looking for new recruits and I'm especially interested in teaching little kids how to do it! I will keep you updated as I get more information :)
Subscribe to:
Posts (Atom)